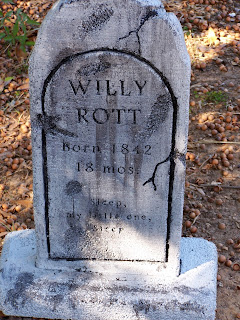
I figured since I already had Fester N. Rott & Diane Rott, I might as well go one step further. The dates I have on both of those two lent themselves to a sad truth that I decided to use. When we go visit the older cemeteries, we always see graves for youngsters all over the place with the dates in the 1800's. So I decided to give the Rott's an infant son....Willy
So today I made Willy's gravestone:
Here's another pic of the stone:
The stone says : Willy Rott... Born 1842... 18 mos. ... Sleep, my little one, Sleep
I have the stone in betwen his mom & dad:
Maybe next year I will fence off a section so they have their own lil family plot. Jen says this is really creepy, but for me it just fits into the whole vision I have towards realism...hehehe
Tomorrow is the big day!!!! My anniversary and Halloween!!!! Woohoo!!!!
Happy Haunting!!!!
~Bill
Saturday, October 30, 2010
Monday, October 25, 2010
Pictures of the yard
One of my many challenges is night photography. I suck at it. Normally that would not be an issue; however, since my yard looks the coolest at night with the lights and the smoke, it does tend to cause me issues with sharing what my yard looks like. But here are a few that I think are ok....
I wish they were better but they give you an idea of the yard at night...
Happy Haunting!!!!
~Bill
I wish they were better but they give you an idea of the yard at night...
Happy Haunting!!!!
~Bill
Friday, October 22, 2010
New Tombstone: Fester (Diane's Husband)
So since I completed Diane Rott's gravemarker I thought I should also do her husband's...Fester N. Rott....
I carved the Angel of Death and the hourglass the same way that I did the cat on annie's stone.
The epitaph reads " It does my heart a world of good...To see you in a box of wood"
Only 9 more days left... I'm so excited!!!!
Happy Haunting!!!
~ Bill
Tuesday, October 19, 2010
Tombstone: Diane Rott Finished
As promised here is the final picture of the tombstone:
I think I am finished with it. We're getting closer to the BIG day.
Happy Haunting!!!!
~Bill
I think I am finished with it. We're getting closer to the BIG day.
Happy Haunting!!!!
~Bill
Monday, October 18, 2010
New Tombstone: Diane Rott
So yesterday I made a new tombstone: Diane Rott ( play on the words Die n Rot). Here is the pics... I still think I am gonna weather it a bit more, not sure yet though....
And another....
and the inscription/epitaph...
Anyway, off to work on another Tombstone.
Happy Haunting!!!!
~Bill
And another....
and the inscription/epitaph...
And here's a night shot...
Only 13 more days and so much left to do. We put the ground fog machines out tonight and did a test run. I think they will work well. Fog acts different here in Florida than it did in Utah. Anyway, off to work on another Tombstone.
Happy Haunting!!!!
~Bill
Sunday, October 17, 2010
Completed: Gavin's Crypt
Yesterday, being Saturday, was finish Gavin's crypt day. In all honesty, it is 70% his, 30% mine. (Especially, since he ditched me yesterday to play with a friend....lol) So here it is:
I think we did a good job on it. I am pleased with it so far. He ditched me after we got the top built, so I had to paint it. I did the opposite of what we did to the sides... I sprayed the entire top with a base coat of white and I let it dry. Then instead of using a roller I sprayed the entire top with a coat of black and used the hose on mist to "wash away" the paint. Here I am washing it away:
Here is what it looked like after I washed the black away:
I think I like this effect better than when I base coated black and washed the white away. And yes, the name on the crypt is one of my wife's great grand-mother:
And here is the finished top:
I added some moss to it (hoping it made it look "spookier and older"). The next few shots are of me putting it in the yard. I modified the "plan" for the crypt by putting pvc tubes on the inside to hold the rebar so the crypt is more secure.
Inside the crypt I added a green spot light facing inward and a fog machine (also facing inward). At night the green light shines through the cracks and "holes" that are in the crypt. It looks really creepy. Our camera takes really crappy night pictures so I am working on getting a good shot to post.
So the inspiration for this is from the Mitchell's new book "How to Haunt your House Book 2" page 20. I suggest you guys go and grab you a copy ASAP (so you can make cool stuff too!!!!)
More to come......Happy Haunting!!!!!
~Bill
Sunday, October 10, 2010
Gavin's Crypt
Well, as I said in a previous post, Gavin (my 9 year old son) is working on the Tomb Cover from How to Haunt Your House Book 2 (by Shawn & Lynne Mitchell). Here's his progress... We should be completely finished by the weekend, I think we'll be finished sooner...
We've measured the panels and he is getting ready to use a jigsaw for the very first time.We did have an ambulance on stand by just in case...
Here he is actually cutting. He did an excellant job. I was very proud of him... in fact, we were able to dismiss the rescue squad that was on stand by.
I drew some lines on the wall panels, and gave him the dremel tool. I told him to trace the lines. I also said they did not have to be perfect... again, surprisingly, no one had to go to the emergency room.
So this is one of the panels ready for painting. I didn't take a pic of it but we primed it with Monster Mud and then sprayed the entire panel black.
Here Gavin is spraying the panel with water. I think he did a great job so far. For me the jury is still out on this technique. I'll make a decision after we've finished. We still have a few more details to add the the panels..
This is the front panel so far....
This is one of the side panels....
We still have the lid to make. Everything is cut out. We just have to glue it all together and detail it before we can paint it. As soon as we are finished I will post the pics....
Happy Haunting All!
Tuesday, October 5, 2010
Book Review - How to Haunt Your House Book 2 by Shawn and Lynne Mitchell
My mother in law and brother in law got me this book for my birthday last month. I was so excited to get it.
This book is a professionally put together product. I know I've ranted before on how I dislike the home publisher jobs we get all too often. the pictures are detailed and clear (and large enough that you can actually see them). This is what I've come to expect from these two authors.
So to the "meat and potatoes" of the book. I think all of the projects that are in this volume are explained in enough detail that a novice can be successful in completing them. In fact, my 10 year old son is working on one of them now. (Page 20 "Tomb Cover") All of the steps are clearly outlined. The only thing that might have been helpful for my son would have been measurements and quantities. However, for our purposes we would have probably adjusted the dimensions anyway. To be honest that is really the only negative I could find, and that isn't really a negative is it?
As with Book 1, this volume gets you thinking of ways to do things that you may not have thought of before. My wife calls it a more "artsy" way of haunting. that it seems to hint of theatrical scene design techniques. I would still like to see a DVD companion to this series.
I highly recommend this book to every home haunter. the argument is always why purchase a book when a lot of techniques are available for free on the internet? My answer is simple... these are tried and true methods that produce top quality results... Support your fellow home haunters and go out and get a copy of How to Haunt your House Book 2>>>
Happy Haunting!!!!
~Bill
Saturday, October 2, 2010
Annie's Stone in the yard
So here is what I think I'll do with Annie's stone. I hope that she likes it:)
I used part of a store bought prop from last year... I wanted it to be special or as special as it can be... So here ya go Annie:)
Happy haunting!!!
~Bill
Subscribe to:
Posts (Atom)